User's Guide
- Explanation
- The 1. start
- How to work with PixelRuler
- New Scales for Real and Virtual Pixel
- How to use 2 rulers
- Measurement
- Measurement by setting a start and end point
- New Angle function I
- New Angle function II integrated into the measurement function
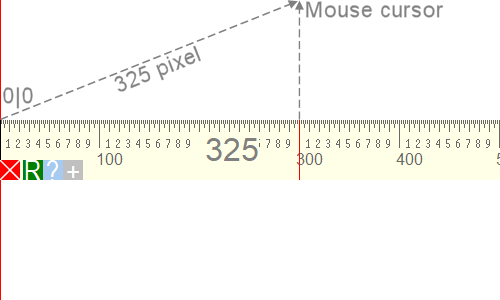
- New Distance measurement from coordinate origin 0|0 to any point on the screen
- New Golden ratio from coordinate origin 0|0 to current length of the ruler
- Popup menu Settings
- Ruler width, Font size, Font- and Background color, Reading help
- Monitor calibration to show individual units of length (mm, cm, inch, etc.)
- Hotkeys
- Transparency
- Zoom window
- Program abort/minimize
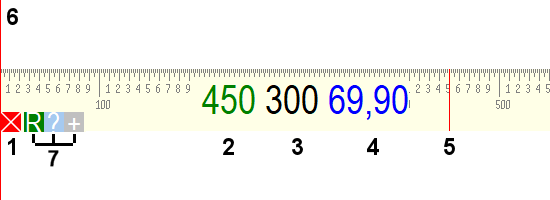
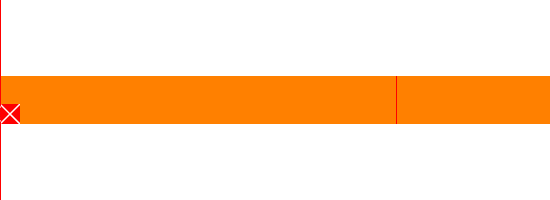
Explanation
- (1) Exit the program or minimize to the System-Tray
- (2) Actual position (green) of the mouse cursor (5) in real pixels
- (3) Actual position (black) of the mouse cursor (5) in virtual pixels: if scaling <> 100% or DPI <> 96 (here in the example shown by 150 DPI)
- (4) Actual position (blue) of the mouse cursor (5) in unit of length (mm, cm, inch, etc.)
- (5) Mouse cursor (red line)
- (6) Red bar helps to align the ruler
- (7) Button V(irtual) / R(eal) on the ruler to switch between both scales
Button ?(Help) on the ruler to show the keyboard and mouse functions
Button +(Zoom) on the ruler to show/hide the Zoom window
The 1. start
After starting PixelRuler for the first time, the program minimized as an Icon in the System-Tray:

Now you should proof or modify some of the program settings (see Popup menu Settings).
How to work with PixelRuler
(see complete Keyboard allocation + Mouse functions)
- A click with the left mouse button onto the Icon (System-Tray) or ALT+F1 opens PixelRuler (another click minimizes the program).
- Press and hold the left mouse button to place PixelRuler on every screen position you like.
- Press Arrow keys (up, down, left ,right) to move the mouse cursor.
- Press SHIFT+Arrow keys (up, down, left, right) to move the whole ruler.
- A doubleclick onto the ruler changes the ruler's alignment from horizontal to vertical and back again.
- For exact alignment of the ruler, it is best to use the zoom window and move the mouse to the desired position, then press ALT+J and the ruler jumps to the current mouse position.
- The program remembers its current position, when you shut down it and places themselves after a new start on the old position.
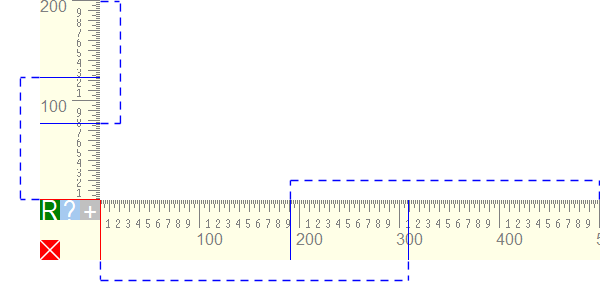
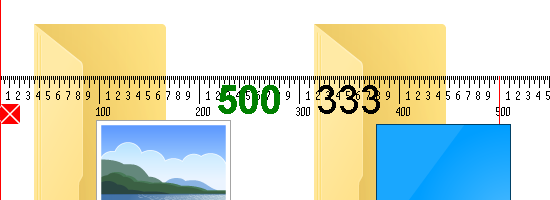
NewScales for Real and Virtual Pixel
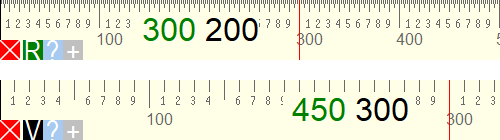
With a user-defined scaling factor (> 100% or DPI > 96), PixelRuler offers a 2nd scale for virtual pixel, which is adapted to the respective scaling factor.
In the 2 below pictures, the upper scale is for Real pixel, and the lower one is for Virtual pixel. In this case the monitor has a scaling factor of 150 DPI. This means that e.g. 300 (150) real pixel, are converted to 200 (100) virtual pixel.
Please note: the virtual scale is "roughly" subdivided, because not all scale divisions can be drawn for each pixel if the result of converting the scaling factor is a fractional value, which should theoretically be between 2 pixels. It is easy to see on the virtual scale when the mouse cursor is moved pixel by pixel with the arrow keys, and you can see that although the green, real pixel coordinate number always increases/decreases by one, the virtual, black pixel coordinate number often doubles occurs one after the other. Unfortunately, this pixel inaccuracy cannot be changed and is - as everyone has probably noticed under Windows - also the reason why scaled images, windows, characters, etc., look a bit spongy or washed out under Windows!
Use the button V(irtual) or R(eal) on the ruler to switch between both scales. The ?(Help) button is used to display keyboard and mouse functions, and the +(Zoom) button is used to show/hide the zoom window.
How to use 2 rulers
As a new feature, the commercial PixelRuler version contains, at the request of many users, additional 2 rulers which are horizontally + vertically connected. The program can also be run multiple times in order to independently place several individual rulers on the monitor.


Measurement
To measure a distance, move the mouse cursor(5) over the ruler and you will get the actual cursor position(2), which follows the mouse cursor.
It could be also very useful to change the ruler colors and transparency and to use the Arrow keys (left, right, up, down).
Measurement by setting a start and end point
You dont need to move the ruler to measure between 2 points. To start a measurement, move the mouse cursor to the first measuring position and press the space bar. Now you can see a red line (see picture below), which follows the mouse cursor. Go to the second measuring position and press again the space bar. Now you will see a red number, which shows the distance between both measuring points. To start a new measurement, press the space bar again, or you can cancel it by pressing the ESC-key.
Note: the ruler must have the focus to start and stop the measurement
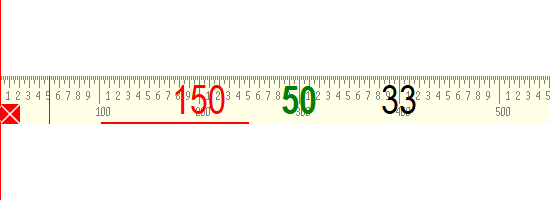
Example: we have started the measuring from "101" to "250", and got the distance "150".
New Angle function II integrated into the measurement function
The Angle function II is integrated into the measuring function of the ruler (see above: Measurement by setting a start and end point) by using the space bar to start and stop the measurement, and to abort with the ESC-key. The output of the angle (in the picture: red number in brackets) is set by setting the 1st measuring point as the coordinate origin 0|0, and a 2nd measuring point at the current Mouse position.
(using atan2, in the right-hand Cartesian coordinate system).
The two measuring points do not have to be on the ruler, they can be anywhere on the desktop!
The angle function does not work with the vertical ruler because there is not enough space to display the angle!

New Angle function I
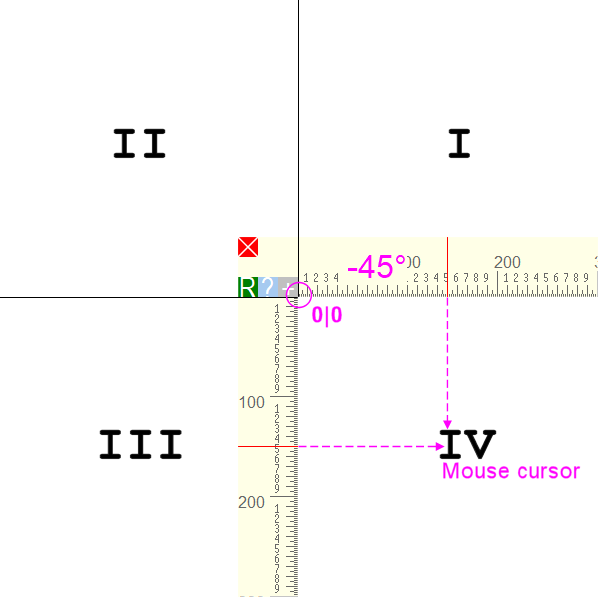
To output the Angle function I, the menu item "show Coordinates on Ruler / Angle from 0|0 (violet)" must be activated. The angle is measured from the coordinate origin 0|0 of the ruler to the mouse cursor (using atan2, in the right-hand Cartesian coordinate system), and can yield positive or negative results using the atan2 function, depending on quadrant I to IV.
New Distance measurement from coordinate origin 0|0 to any point on the screen
To output the Distance (in pixel), the menu item "show Coordinates on Ruler / Distance from 0|0 (grey)" must be activated. The distance is determined from the coordinate origin 0|0 of the ruler to the mouse cursor (using the Pythagorean theorem).
NewGolden ratio from coordinate origin 0|0 to current length of the ruler
To output the Golden ratio (using 2 blue lines), the menu item "show Coordinates on Ruler / Golden ratio (2 blue lines)" must be activated. The Golden ratio is determined from the coordinate origin 0|0 of the ruler to the current length of the horizontal/vertical length of the ruler. This distance (100%) is divided into two sections in such a way that the longer section (~61.8%) is related to the shorter section (~38.2%) in the same way as the total section is to the longer section, and each in a ratio of 1: 1,618. In each case 2 blue lines are set on the horizontal/vertical ruler in order to display the golden ratio on the left or right, or on top or bottom.
Popup menu Settings
Open the following Popup menu with a right mouse button onto the ruler.
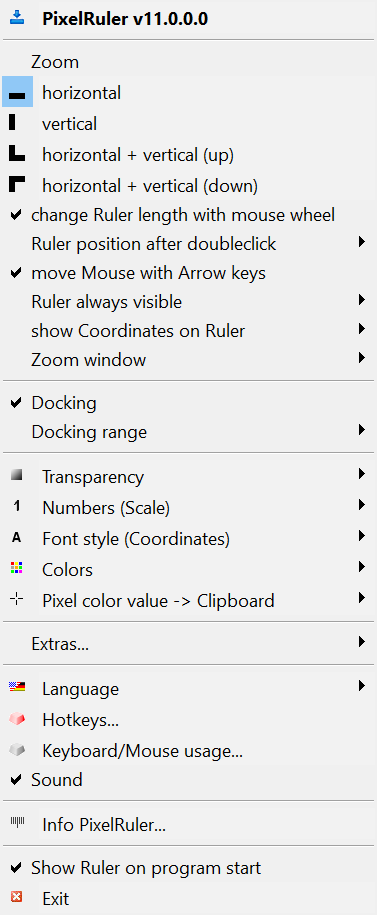
- Click on PixelRuler v11.0.0.0 or use ALT+F1 to show/hide the ruler on the desktop/system tray(see also Hotkeys).
- With Zoom a new window opens/closes, which shows the area under the actual mouse cursor with zoom factor 9.
- The menu items horizontal, vertical, horizontal + vertical (up), horizontal + vertical (down) show one or both rulers depending on the orientation.
- Use change Ruler length with mouse wheel to decrease/increase the ruler in steps by 10 or 100 pixels.
- With Ruler position after doubleclick you can change the horizontal/vertical alignment (only on single rulers) in 3 ways:
- previous Position: the ruler will be placed on his last horizontal and vertical position.
- current Mouse position: the ruler will be exactly placed on the position where you have made the doubleclick - with full ruler length.
- left Ruler corner: toggles the ruler position on his left corner.
- Use move Mouse with Arrow keys to de-/activate this function.
- Ruler always visible will show the ruler inside the visible (top, bottom, left, right) monitor area.
- With Reset Ruler positions all ruler positions are reset to the upper left corner of the monitor, if the ruler has been moved completely out of the visible monitor area.
- show Coordinates on Ruler will show the values:
- real Pixel (green)
- virtual Pixel (black)
- Unit of Length (blue), and its Monitor calibration (Pixel --> Unit of Length)
- Angle from 0|0 (violet)
- Distance from 0|0 (gray)
- Golden ratio (2 blue lines) Note: You can use the ruler as a Reading help if you disable all coordinates.
- Use Zoom window to change the view size (200x200, 300x300, 400x400, 500x500 Pixel) of the Zoom window.
- If Docking is checked, the ruler moves automatically to the screen border, when the ruler position is within the docking range.
- The Docking range can be within 10, 20 and 30 pixels.
- Use Transparency to let other programs, or the Window's desktop, show-through. Use Front- and Background to get a percent range of transparency. The submenu items Background (Ruler) and Background (Coordinates) make the ruler background and the coordinates background completely transparent.
- Use Numbers (Scale) to adjust the size of the scale numbers:
- all numbers in 5px size.
- all numbers in 6px size.
- only even numbers (large).
- only odd numbers (large).
- With Font style (Coordinates) you can set different fonts and sizes for the horizontal and vertical view of the ruler.
- Use Colors to change the ruler's background color as well as the scale and font colors.
- Pixel color value -> Clipboard: if the ruler has the focus, use (changeable Hotkey) ALT+X to copy the actual color value (as HTML, Long, RGB, TColor, VB, or Websafe value) to the clipboard.
- Under Extras... rarely required functions will be stored in the future:
- minimize by clicking on the "X" minimizes the ruler into the system tray instead of closing the program.
- show additional buttons on the ruler to show/hide some new buttons on the ruler (e.g. "?" button to display the keyboard and mouse functions, and "+" button for the zoom window).
- You can change the language between german and english.
- Use Hotkeys to change the keyboard combinations ALT+F1 to show/hide the ruler on the desktop, and ALT+X to copy the actual color value to the clipboard.
- Keyboard/Mouse usage shows a new window with an overview about all keys and mouse buttons which controls PixelRuler.
- A short Sound will be played if the current pixel color value was copied to the clipboard with ALT+X.
- You can support the development of PixelRuler with your Feedback on my Website.
- Use Help, or F1, to show the help file.
- Use Homepage to visit my website.
- Info PixelRuler shows license-/registration information.
- Search online for updates will be started once a week, and a message window appears as soon as a new PixelRuler version is available for download.
The query does not send any personal data, but only an HTTP-GET request to a web page script on pixelruler.de, which answers with the current version number. - Use Show Ruler on program start to directly show the ruler after you have start PixelRuler.
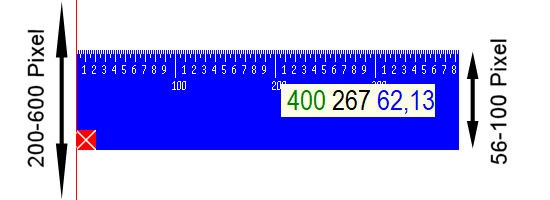
Ruler width, Font size, Font- and Background color, Reading help, Red bar width
- Change the Ruler width with ALT+Arrow key between 56-100 Pixel.
- Change the Red bar width with ALT++/- between 200-600 Pixel.
- Use Font Style Coordinates to change the font size of the coordinates, and Colors for the Font- and background color of the ruler.
You can use the ruler as a Reading help if you disable all coordinates under show Coordinates on Ruler. Also you should use the same color for the Font scale and Background.
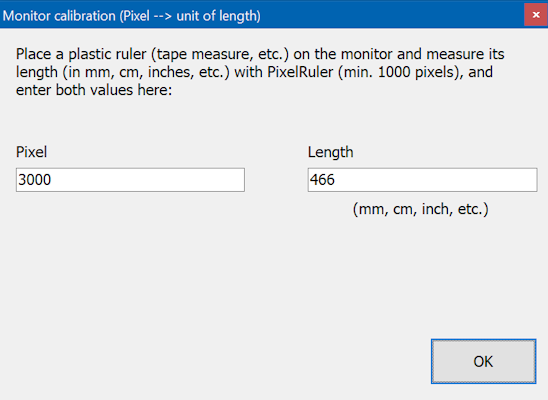
Monitor calibration to show individual units of length (mm, cm, inch, etc.)
With show Coordinates on Ruler and the sub menu Monitor calibration (Pixel --> unit of length) you can measure in e.g. in Millimeters, Centimeters, Inches, etc. instead of Pixel.
In the example (see below) the length of PixelRuler was set to 3000 pixels and its length (466mm) was measured with a plastic ruler. Result: the blue coordinate shows the length ratio of 3000: 466 as millimeters (==> x pixels pro millimeter).
Or vice versa: put a 30cm long plastic ruler on the monitor and measure with PixelRuler the length of these 30cm in pixel. E.g. if you have measured 1500 pixels, the result would be a ratio of 1500 : 30 as centimeters (==> x pixels pro centimeter), or 1500 : 300 as millimeters. It works the same with other units of measurement like inches etc.
Note: measure the largest possible distance on the ruler (min. 1000 pixels) to reduce inaccuracies in the measurement!
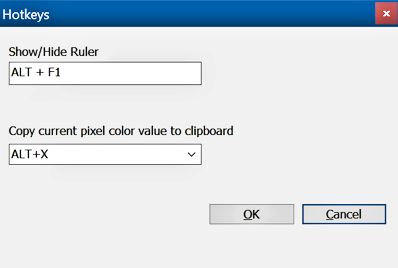
Hotkeys
Use Hotkeys to change the keyboard combinations ALT+F1 to show/hide the ruler on the desktop, and ALT+X to copy the actual color value to the clipboard.
Transparency
Use Transparency to let other programs, or the Window's desktop, show-through. The submenu items Background (Ruler) and Background (Coordinates) make the ruler background and the background for the running coordinates values completely transparent.
Please note :
- transparency only works on NT-Operation systems (NT, W2K, XP, 2003, Vista, 7, 8, 10), and not with W9x and Windows ME !
- it's possible that the zoom window does not show any transparent ruler !
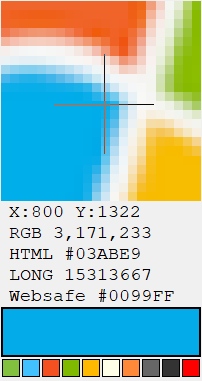
Zoom window
The X- and Y-values show the system-wide mouse cursor coordinates. The RGB-, HTML-, LONG- and Websafe values show the current pixel color under the mouse cursor. Inside the zoom window you can use the Arrow keys (left, right, up, down) for an exact positioning. Use the changeable Hotkey ALT+X (system-wide) to copy the actual pixel color value (as HTML, Long, RGB, TColor, VB, or Websafe value) to the clipboard. The last 10 determined pixel color values are also stored in the 10 color fields at the bottom of the zoom window. A doubleclick will close the zoom window. The menu item Zoom window let you change the view size of the Zoom window, or you can use the mouse wheel.
Program abort/minimize
Click onto the red x button(1), or use the keys ALT-F4 to abort PixelRuler. If you only want to minimize PixelRuler as an Icon in the System-Tray, use the Hotkey ALT-F1, or the 1st popup menu item "PixelRuler v11.0.0.0". The option minimize by clicking on the "X" minimizes the ruler into the system tray instead of closing the program.
Einträge: 2
Anne 30.Mar.2021 19:11Can I turn the ruler 90 degrees to measure a box height?
Lucian Naie 18.Feb.2019 11:18Hi, It would be good to build a feature that offers the possibility to lock the red line on the ruler on, let's say, double click. It will be helpful when taking screenshots with windows snipping tool. Thanks


